Kobuto Bozu won Round 3 of the Universe of Violence Concept Deathmatch Tournament of Doom.
Say that ten times fast.
I'll do more polished sketches of the winning three concepts for the final round.
Also, I will be sending a prize to one random voter in the finals... So, hopefully you guys will show out.
Zach Orian, you have three days to get me your address, or I am feeding your prize to a wild animal.
<3-R
Wednesday, September 26, 2012
Tuesday, September 25, 2012
A Beginner's Guide to Hobby Mold Making
Greetings, minions!
I did a casting project with the Iron Runt, to get her feet wet in the world of mini figure production. She sculpted a couple of very basic figures, and we took pictures of the mold making process. As promised, we're going to share that process with you all.
Now, this is a very basic rundown of how to do the most basic of mold making. There are a multitude of more advanced techniques, many that I am sure that I still need to learn. Sculpting and casting are a constant learning process, so please do not get discouraged if it doesn't turn out exactly how you want the first (or tenth) time you try it.


Here we have the Iron Runt, holding an Allumilite Starter Kit. The
kit retails at roughly $30, and includes everything you need to get
started, short of whatever you decide to make your mold box out of.
It has a small portion of silicone, just enough activator for that amount of silicone, modeling clay (more on that later), measuring cups, stirrers, and parts A and B of the casting resin. The silicone is hardly top-of-the-line, but for a beginner, it's perfect. Easy to mix, relatively easy to pour, and it's hard to be heartbroken if you mess up along the way.

 Here are the "mold boxes".
One of them, I made our of Legos. I like this method, as Legos are reusable and removing the mold from the box is easy. I also like using Legos for the simple fact, that if you ever have to go back to add more to a mold (or in the case you wind up doing a two-part mold), you don't have to measure or guess the dimensions of the original mold box. It's very geometric, and easy to keep score of.
 The other mold box, is simply a Dixie cup. I pressed the modeling clay down into the bottom of both molds; it is very important to make sure that mold boxes are sealed off, otherwise your silicone is going to escape through the bottom. I know that seems pretty basic, but that is an easy thing to forget if you are not used to the routine.
You can also use the modeling clay to seal the mold box on the outside edge, but for this exercise, I chose to seal it on the inside.
To the left, is the silicone provided by the kit. Any time you are working with chemicals, you want to make sure to protect yourself. Wear gloves whenever you're mixing any of the chemicals during
the processes of mold making and casting.


Now, I am mixing the activator into the silicone. There is exactly the amount of activator you need, included with the kit. It is important to not waste any, as it will throw off the mix of your silicone, which could compromise it's integrity.
It's very important to make sure that you mix the activator and the silicone base, very thoroughly.


When you pour into your mold, you want to hold the cup with the silicone well above the piece in the mold, and you want to angle your pour. A nice, thin stream will result and you can actually see air bubbles work themselves out of the silicone on their way across the lip of the cup.
You want to aim the stream of silicone at the piece, lightly covering the figure. Don't worry about filling the negative space around the figure: Gravity will do that for you. Concentrate on forcing that stream onto the figure in the mold. That will force air away from the figure, minimizing the amount of air pockets created. Air pockets will result in bubbles of product on your castings (typically in the finer details, exactly where you don't want them.) Once your mold is filled, you then want to take a solid tool, and tap the sides of the mold, to further promote the air bubbles in the silicone to rise to the surface. You can also vibrate the mold to achieve the same effect. This article is written based on the assumption that this is your first casting, and that you aren't investing in a vacuum chamber or pressure pot.


 As you tap the mold, you'd witness air bubbles rising to the surface. You want to do this lightly, off-and-on, for about five or ten minutes (or until you stop seeing air bubble rise).
Once you are done with that step, you must engage in one of the hardest parts of the process: Waiting. Put the mold aside, and DO NOT mess with it for at least 24 hours. Read the instructions, and strictly adhere to whatever the cure-time specified is.

I did a casting project with the Iron Runt, to get her feet wet in the world of mini figure production. She sculpted a couple of very basic figures, and we took pictures of the mold making process. As promised, we're going to share that process with you all.
Now, this is a very basic rundown of how to do the most basic of mold making. There are a multitude of more advanced techniques, many that I am sure that I still need to learn. Sculpting and casting are a constant learning process, so please do not get discouraged if it doesn't turn out exactly how you want the first (or tenth) time you try it.


Here we have the Iron Runt, holding an Allumilite Starter Kit. The
kit retails at roughly $30, and includes everything you need to get
started, short of whatever you decide to make your mold box out of.
It has a small portion of silicone, just enough activator for that amount of silicone, modeling clay (more on that later), measuring cups, stirrers, and parts A and B of the casting resin. The silicone is hardly top-of-the-line, but for a beginner, it's perfect. Easy to mix, relatively easy to pour, and it's hard to be heartbroken if you mess up along the way.

 Here are the "mold boxes".
One of them, I made our of Legos. I like this method, as Legos are reusable and removing the mold from the box is easy. I also like using Legos for the simple fact, that if you ever have to go back to add more to a mold (or in the case you wind up doing a two-part mold), you don't have to measure or guess the dimensions of the original mold box. It's very geometric, and easy to keep score of.

You can also use the modeling clay to seal the mold box on the outside edge, but for this exercise, I chose to seal it on the inside.
To the left, is the silicone provided by the kit. Any time you are working with chemicals, you want to make sure to protect yourself. Wear gloves whenever you're mixing any of the chemicals during
the processes of mold making and casting.


Now, I am mixing the activator into the silicone. There is exactly the amount of activator you need, included with the kit. It is important to not waste any, as it will throw off the mix of your silicone, which could compromise it's integrity.
It's very important to make sure that you mix the activator and the silicone base, very thoroughly.


When you pour into your mold, you want to hold the cup with the silicone well above the piece in the mold, and you want to angle your pour. A nice, thin stream will result and you can actually see air bubbles work themselves out of the silicone on their way across the lip of the cup.
You want to aim the stream of silicone at the piece, lightly covering the figure. Don't worry about filling the negative space around the figure: Gravity will do that for you. Concentrate on forcing that stream onto the figure in the mold. That will force air away from the figure, minimizing the amount of air pockets created. Air pockets will result in bubbles of product on your castings (typically in the finer details, exactly where you don't want them.) Once your mold is filled, you then want to take a solid tool, and tap the sides of the mold, to further promote the air bubbles in the silicone to rise to the surface. You can also vibrate the mold to achieve the same effect. This article is written based on the assumption that this is your first casting, and that you aren't investing in a vacuum chamber or pressure pot.


 As you tap the mold, you'd witness air bubbles rising to the surface. You want to do this lightly, off-and-on, for about five or ten minutes (or until you stop seeing air bubble rise).
 Once you are done with that step, you must engage in one of the hardest parts of the process: Waiting. Put the mold aside, and DO NOT mess with it for at least 24 hours. Read the instructions, and strictly adhere to whatever the cure-time specified is.
Once the mold has cured, and is completely firm to the touch, remove the mold box. If you used Legos, this is really easy. Just start taking the bricks off of the mold, piece by piece. Take the modeling clay off from the base, and let it sit for a couple of hours, to make sure that air can get to the inside of the mold.
From that point, you can start casting. There are as many casting techniques as there are mold making techniques, and that is another post for another day. But, if you follow the same basic principles (paying attention to the mix ratio, and pouring to avoid air pockets/build up), you should be okay. A lot of casting involves trial and error... Most pieces are pretty unique, and you should expect their casting experiences to be the same.

To summarize what I am trying to get at: getting started in mold making and casting, is nowhere near as scary as it may seem at first. You can get starter materials relatively cheap, and there are a multitude of resources online to help. Don't panic, and don't be intimidated. Mistakes will happen, you have to just roll with the punches, and learn from the experience.
If you have questions, leave them in the comments below.
Later, minions!
-R
Monday, September 24, 2012
Monday Update-Hate, 9/24/2012
Minions!

Get your votes in, on the third round of the Universe of Violence Concept Deathmatch Tournament!
It's not every day that you get to decide what concepts make it into a line, so jump on it.
The finals will sport all-new sketches of the finalists, in a more finished format. Get your votes in, and make them count!
Also: I spent the weekend with the Iron Runt, working on sculpting and casting her first mini figures. I am glad to say that the molds are done, and the first test castings came out just right. I took a bunch of pictures during the process, and will be posting a beginners tutorial either later today or tomorrow. I think it will be helpful to those of you that may be on the fence about getting your feet wet in the whole casting hobby.
Finally:

Ironhaus, getting back into the swing, baby!
Stay tuned, for news on all-new customs coming out from the mad hands of the Dark Lord of the Iron Toy Cult.
Until next time, minions...
I am Rommel.
Tuesday, September 18, 2012
Dr. Dark, Fistful of Aliens Custom
So, in 1997-1999, Yes! Toys released Fistful of Aliens. It was a toyline consisting of three "races" of 1" figures, color-coded in red, green and blue. The link provided above will give you a more complete rundown on the entire line. This post is dedicated to one of the figures in particular: Dr. Dark.

Dr. Dark was part of the "Shadows" subset of boss characters; none of the Shadows were ever actually release, or to my knowledge, produced.
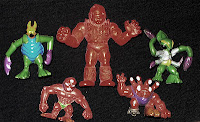
 (FOA figures next to MUSCLE, for size comparison)
I took three cracks at Dr. Dark, and the first two (the bottom two pictured) were way too big.
There were other elements of them that I wasn't all that hot on, such as how one of them looks a lot like Man-Thing from Marvel comics... Haha
Nothing against Man-Thing, but that wasn't quite what I was going for.

Finally, I got the size of the armature right! He's the right scale for the FOA figures, and I feel like he's a lot closer to the target than the previous two attempts.

Here he is, with original FOA figures. Right scale, although I am not entirely sure that he will be the final sculpt I go with. I am working on a fourth take, in Aves Apoxy. I'll probably put them up side by side, for a vote here on the blog. I'll let you FOA fans decide which one cuts the mustard.

Let me know what you guys think. The plan is, to take the finished piece and mold/cast him. I want to make sure that he hits the mark, not just with me, but those who felt left out when Yes! Toys went under. I know I am not the only one that was bummed out that Dr. Dark never made his way into my collection!
Time to go minions...
It's been fun though, right?
-R

Dr. Dark was part of the "Shadows" subset of boss characters; none of the Shadows were ever actually release, or to my knowledge, produced.


I took three cracks at Dr. Dark, and the first two (the bottom two pictured) were way too big.
There were other elements of them that I wasn't all that hot on, such as how one of them looks a lot like Man-Thing from Marvel comics... Haha
Nothing against Man-Thing, but that wasn't quite what I was going for.

Finally, I got the size of the armature right! He's the right scale for the FOA figures, and I feel like he's a lot closer to the target than the previous two attempts.

Here he is, with original FOA figures. Right scale, although I am not entirely sure that he will be the final sculpt I go with. I am working on a fourth take, in Aves Apoxy. I'll probably put them up side by side, for a vote here on the blog. I'll let you FOA fans decide which one cuts the mustard.

Let me know what you guys think. The plan is, to take the finished piece and mold/cast him. I want to make sure that he hits the mark, not just with me, but those who felt left out when Yes! Toys went under. I know I am not the only one that was bummed out that Dr. Dark never made his way into my collection!
Time to go minions...
It's been fun though, right?
-R
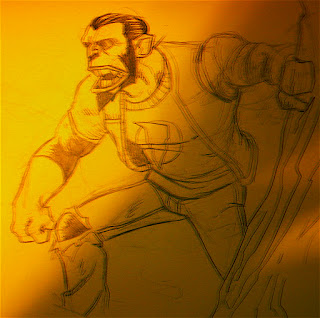
Universe of Violence Wave 3 Tournament: Round 3
We're in the home stretch! This last preliminary round will have four candidates. The voting will last until Monday of next week. Get those votes in!
 #1. Kobuto Bozu

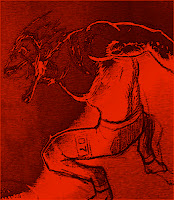
#3. El Viper, Demon of the Deep Rain Forest

#4. Psychomask, The Midget Monster
Alright, minions! Get those votes in!
-R
Saturday, September 15, 2012
Round #2 Winner: #3 Hadolou
Round 3, soon!
-R
Wednesday, September 12, 2012
Universe of Violence Concept Tournament, Round 2
First off, the winner of round 1: Hyenaman, the cackling hench bastard!
He moves on to the finals. I am not going to lie, I am pretty surprised that he was the top vote getter. I mean, I drew him in a couple of minutes. On a napkin. With a Bic pen.
Weird.
 Anyhow, on to ROUND 2!

#1. Red Hand: The Mercurial Murderer

 #2. Eaglemask: German Deathmatch Champion

 #3. Hadolou: Backwoods Demon Barbarian
Round 2 voting runs until Monday. Go!
-R
He moves on to the finals. I am not going to lie, I am pretty surprised that he was the top vote getter. I mean, I drew him in a couple of minutes. On a napkin. With a Bic pen.
Weird.
 Anyhow, on to ROUND 2!
#1. Red Hand: The Mercurial Murderer


Round 2 voting runs until Monday. Go!
-R
Monday, September 10, 2012
New Gorewad Monsters, Coming Sooner Than You Think!

It's on like Marvin Gaye in fly boots!
Also, don't forget to get your vote in on the Universe of Violence concepts below. Winner of round 1 is announced on Wednesday, along with the 2nd round of voting beginning.
-R
Friday, September 7, 2012
Universe of Violence: Character Concept Voting
Okay, a smidge later than I promised, but here it is:
I'm going to post figure concepts, you're going to vote on them. The winner of each week's voting goes to the last week's vote. It's like a deathmatch tournament, with you guys deciding which concept will make the final cut.
Voting will last until Wednesday, when I start the second round. Vote in the comments section.
Without further ado:

#1. Ig. The Sock Monkey Warrior.

#2. Racht: Lizard Alien, Executioner


#3. Hyenaman: Cackling Hench Bastard
There's your first three candidates. It's up to you, now.
-R
Wednesday, September 5, 2012

Saturday, September 1, 2012
Predasaurs: DNA Fusion ::: Review
Can I get a "Hell yeah" for dinosaur minifigures?
Irwin Toys has brought another foreign toy line to us, in Predasaurs: DNA Fusion. I know they originally were released in Europe, where I am not sure. The gimmick is simple: They took two species of dinosaurs, and "fused" their DNA together to make a vicious looking hybrid.
 The figures average 2" in height, with the chase figure Vulltarex standing at 3". They are made out of a firm rubber, and have a fairly substantial weight for their size. The rubber is weighty, and has just the right amount of give. Some of the figures are one solid piece of rubber, and some of the figures are two pieces glued together. Well, haha, maybe I should add that EVERY figure has their teeth piece glued in. Kind of necessary, though... The teeth are cast in glow in the dark rubber.
 The paint applications are pretty nice, not the greatest in the industry, but miles ahead of a lot of the competition. The paint schemes are layered, and have metallic effects. With the standard earthy tones used on the base rubber of the figures, the metallic greens and maroons used really stand out... However are never distracting.
 As far as accessories, each figure comes with a hand-held weapon ranging from clubs to axes. The weapons are also painted with metallic effects, and have a peg that goes into a discreet fitting on the inside of each figure's palm. The pegs are all uniform, making weapon-swapping an easy reality.
Several of the figures in the blind packs come with weapons that have a plastic "gem" embedded in them, for a nice effect.
 The blind packs retail for $2.99, and I believe that they are worth that sum. Each figure is highly detailed, made out of a sturdy rubber, and comes with a weapon and a gameplay trading card.
There are also blister carded 2-packs available, with both figures in full view; the 2-packs also come with a putty accessory (blue, green, and metallic colors available).
I believe that these are worth the retail price, and the coolness factor is definitely there. There is no articulation to speak of, although that just adds to the "Little Rubber Guys" appeal (in my opinion).
Glow in the dark teeth, flexible rubber, nice paint, and a strong premise? I just hope these do well enough to substantiate bringing over the Insect Fusion subset.
Anyways, those are my two cents. I am interested in knowing what you folks think of them!

-R
Subscribe to:
Posts (Atom)